Tri-R Technologies TR-4
BUILDER'S MANUAL
This Builder's Manual is NOT the official manual as published by TRI-R Technologies.
SPAR
PREPARATION
LEVELING
AND FIXTURING
SPREADER
STICKS
TEMPORARY
FITTING OF THE FUSELAGE TOP
FIREWALL
FIREWALL
FRONT FACE
ADDED REINFORCING IN FIREWALL AREA
STATION
139.5 BULK HEAD
STATION
180.5 BULKHEAD
MAIN
SPAR AND OUTBOARD SPAR PRE ASSEMBLY
REAR
SPAR
MAIN SPAR LOCATION AND INSTALLATION
POSITIONING
SPAR
MOUNTING LAMINATIONS
MAIN
GEAR BOX REINFORCEMENT
SEAT
FRONT BULKHEAD & CONTROL MOUNT
FUSELAGE
BELTLINE
CONDUITS
FRONT SEAT BACK ASSEMBLY
REAR
SEAT BACK INSTALLATION
CONTROL
CONSOLE - FRONT SEAT AREA
ELEVATOR
IDLER BELL
CRANK
SEAT BOTTOM ASSEMBLY
FRONT
SEAT
REAR
SEATS
FRONT
FLOOR ASSEMBLY
STICK
LINKAGE ASSEMBLY
FLAP
HANDLE ASSEMBLY BRACKET
AILERON
IDLER INSTALLATION
FLAP ACTUATION TORQUE TUBE INSTALLATION
RUDDER
IDLER LEVER INSTALLATION
HORIZONTAL
STABILIZER
INSTALL
RUDDER POST
ELEVATOR AND PUSH/PULL ROD
INSTALLATION
RUDDER CABLE ROUTING AND
INSTALLATION
MAIN
GEAR INSTALLATION
BRAKE
LINE INSTALLATION
FIN
RIGHT HALF INSTALLATION
INSTALL
LEFT FIN HALF
HANGING
RUDDER
INSTALLATION
OF FUSELAGE TOP
BAGGAGE
AREA BACK PANEL
DOOR
PREPARATION
WINDOW
INSTALLATION
DOOR
LATCH ASSEMBLY
MOUNT
DOORS
LATCH
PLATE INSTALLATION
AIR
STRUT INSTALLATION
REAR
WINDOWS
INSTRUMENT
PANEL
WINDSHIELD
If you have not completed the spar preparation steps outlined in the WING section of the assembly instructions, it might be a good idea to accomplish that task at this time. The assembled center section will be required in the fuselage assembly process. The spar assembly operation requires a large clear area to properly align the spar joints. Completing it at this time will prevent having to disturb the fuselage setup halfway through the assembly process.
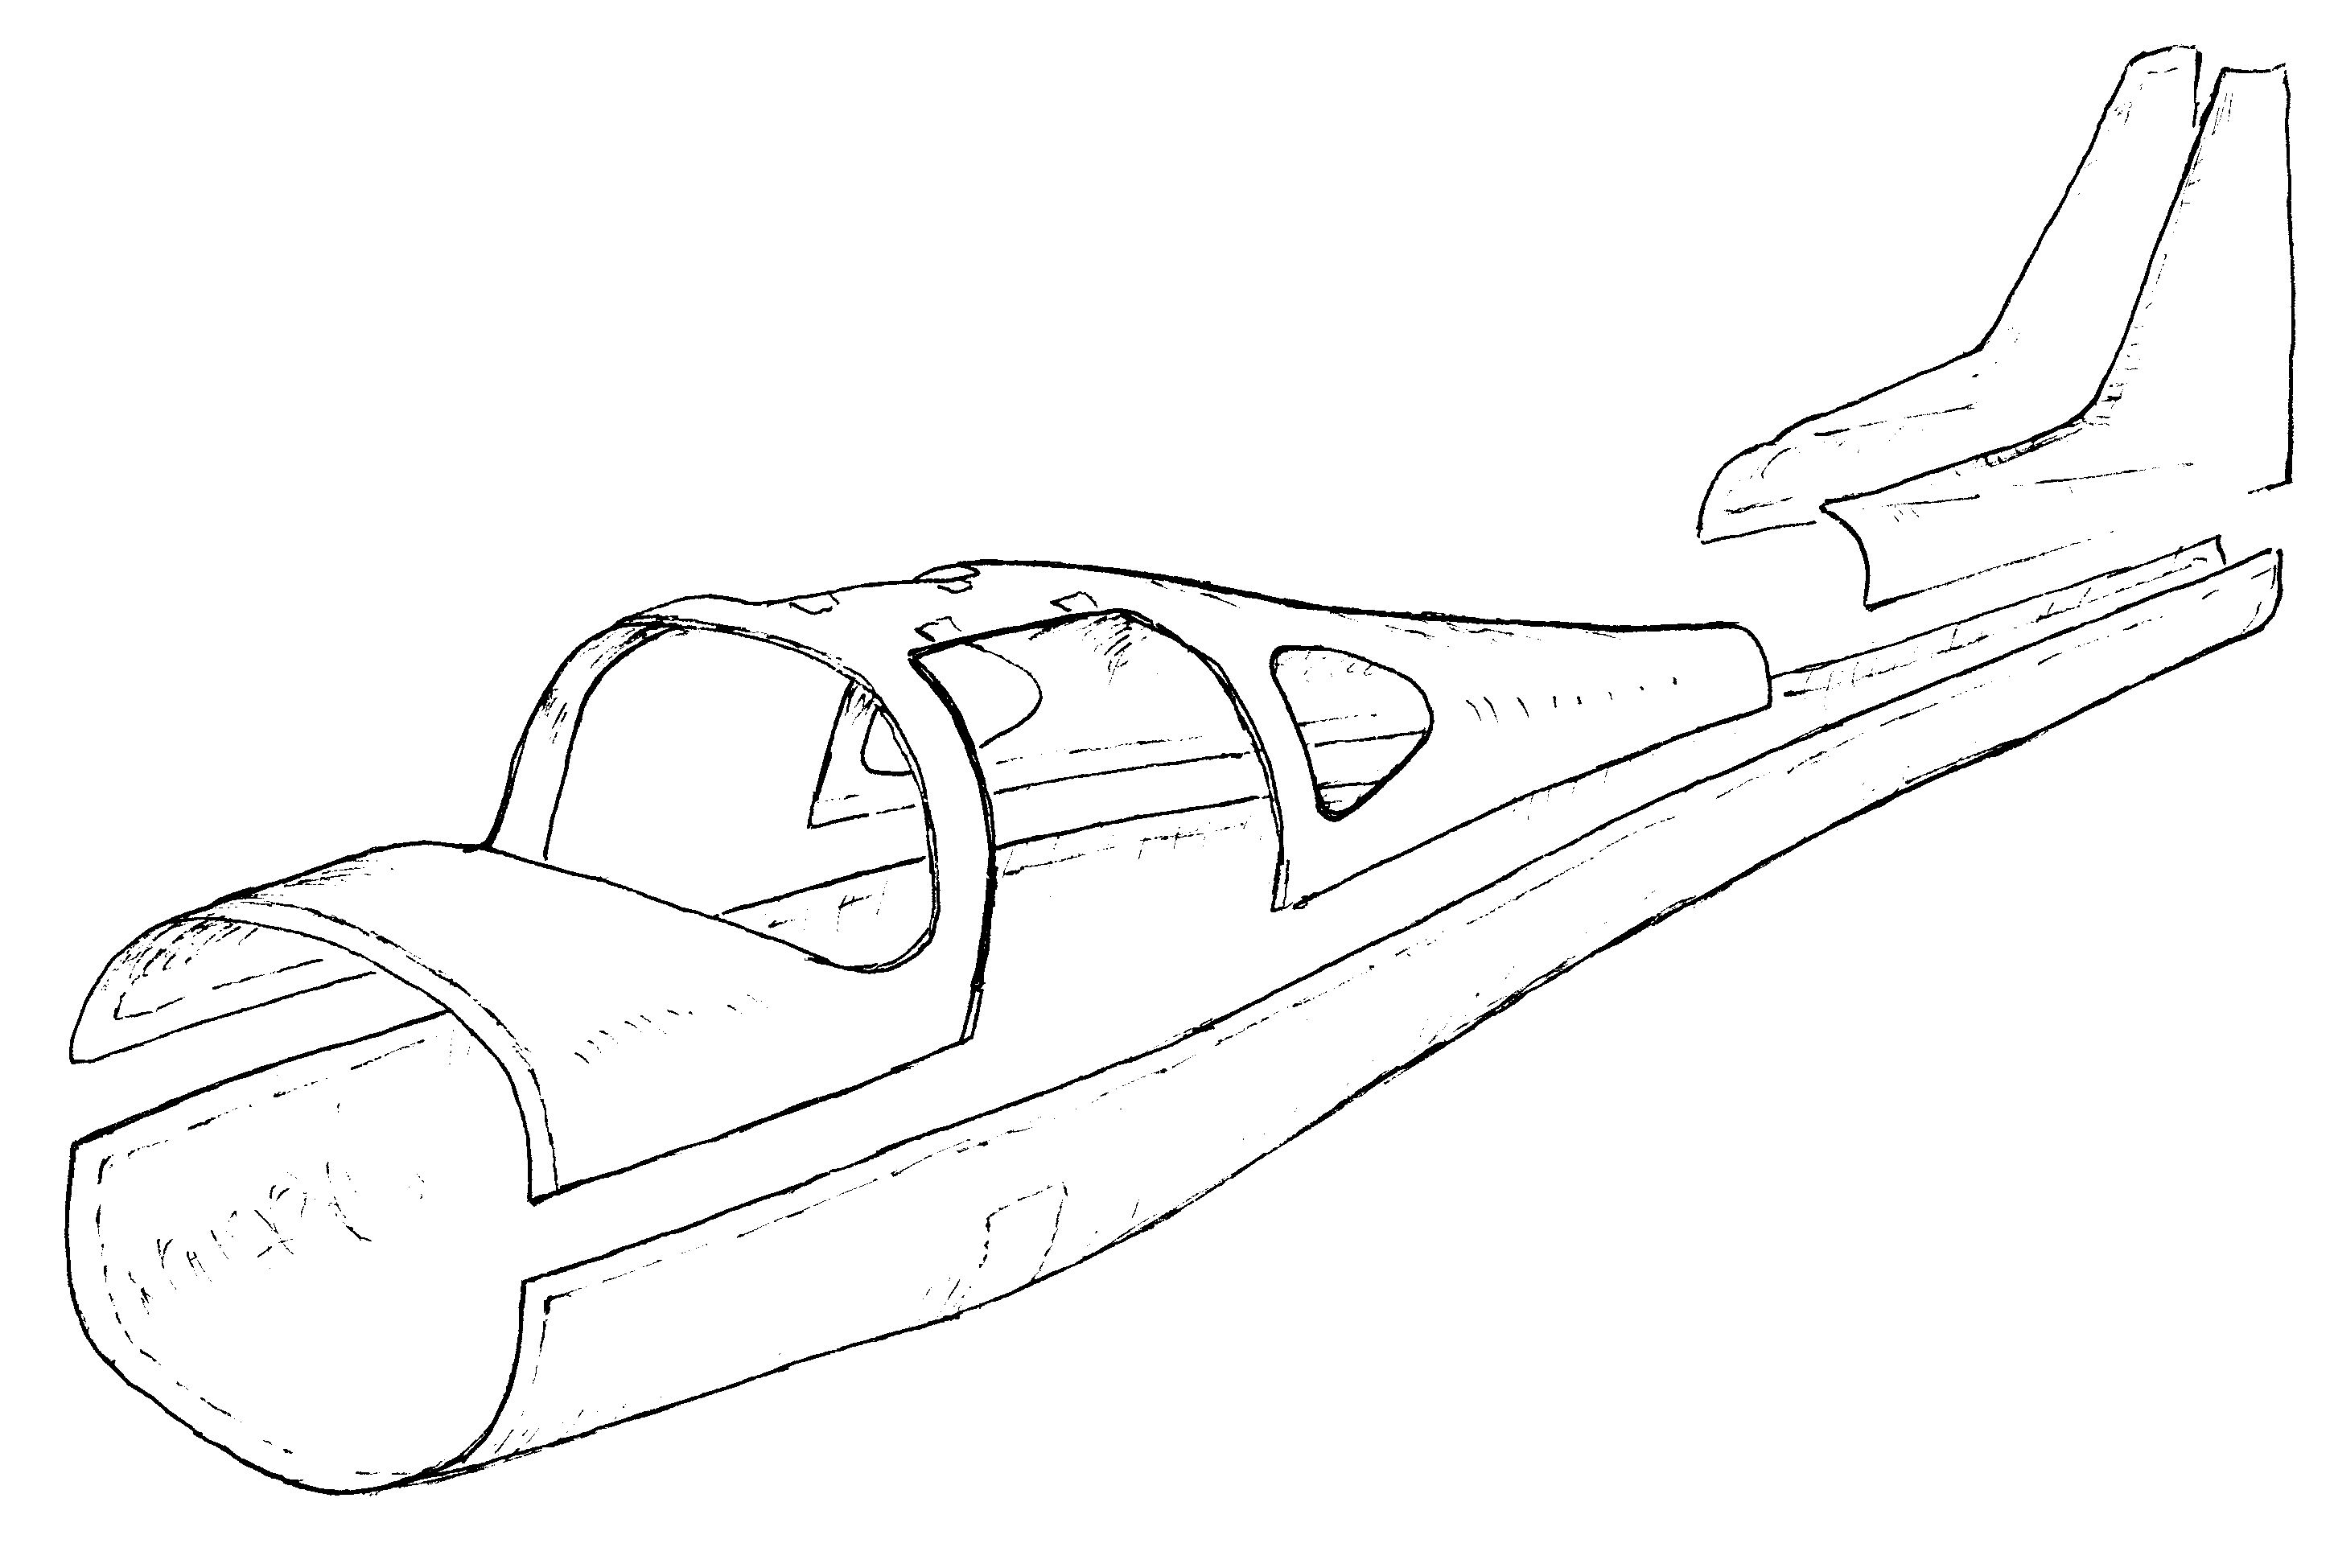
Figure 4-1 shows the major premolded components of the fuselage assembly which includes such associated parts as the cabin doors, and the vertical fin. The initial steps will be preparing the lower fuselage section molding, then fixturing and leveling.
Figure -1, Fuselage component parts.
The lower fuselage trim line is 1.25 inches above the "joggle". The longitudinal factory "joggle" is located at Waterline -1.25. The trimmed edge 1.25 inches above this is Waterline 0.0. Trim this edge quite carefully since this edge will be used for referencing during the leveling procedure. Waterline dimensions above this trim line are positive numbers and below it are negative numbers.
The upper fuselage section should have the factory trim line already scribed at WL -1.25, (Minus 1.25 inch. Corresponding to the joggle in the lower half, which establishes the bond line overlap) and this is where it should be trimmed.
Three sturdy saw horses or similar supports should be procured or fabricated to support the fuselage bottom half during subsequent fabrication steps. Two cradles should be cut out of at least half inch plywood or similar panel material. Front and rear cradle contours can be traced from the appropriate ends of the molded part, and cut out using a saber saw or similar tool. The center support can be flat on top, and located in the recess molded in place for the main gear. Some relatively thin padding material (terry cloth, blanket, thin foam, etc.) should be used on the surface of the cradle where it will contact the fuselage surface. (Reference figure 4-2 showing the fuselage on these supports with some of the leveling provisions in place)
Drywall screws or similar self drilling screws will facilitate attaching these cradles to the face of the saw horse top bar and facilitate making changes of position during the leveling phases quickly and easily. Use a level and string to level the horizontal bond line of the fuselage molding both crosswise and fore and aft (see figure 4-2.).
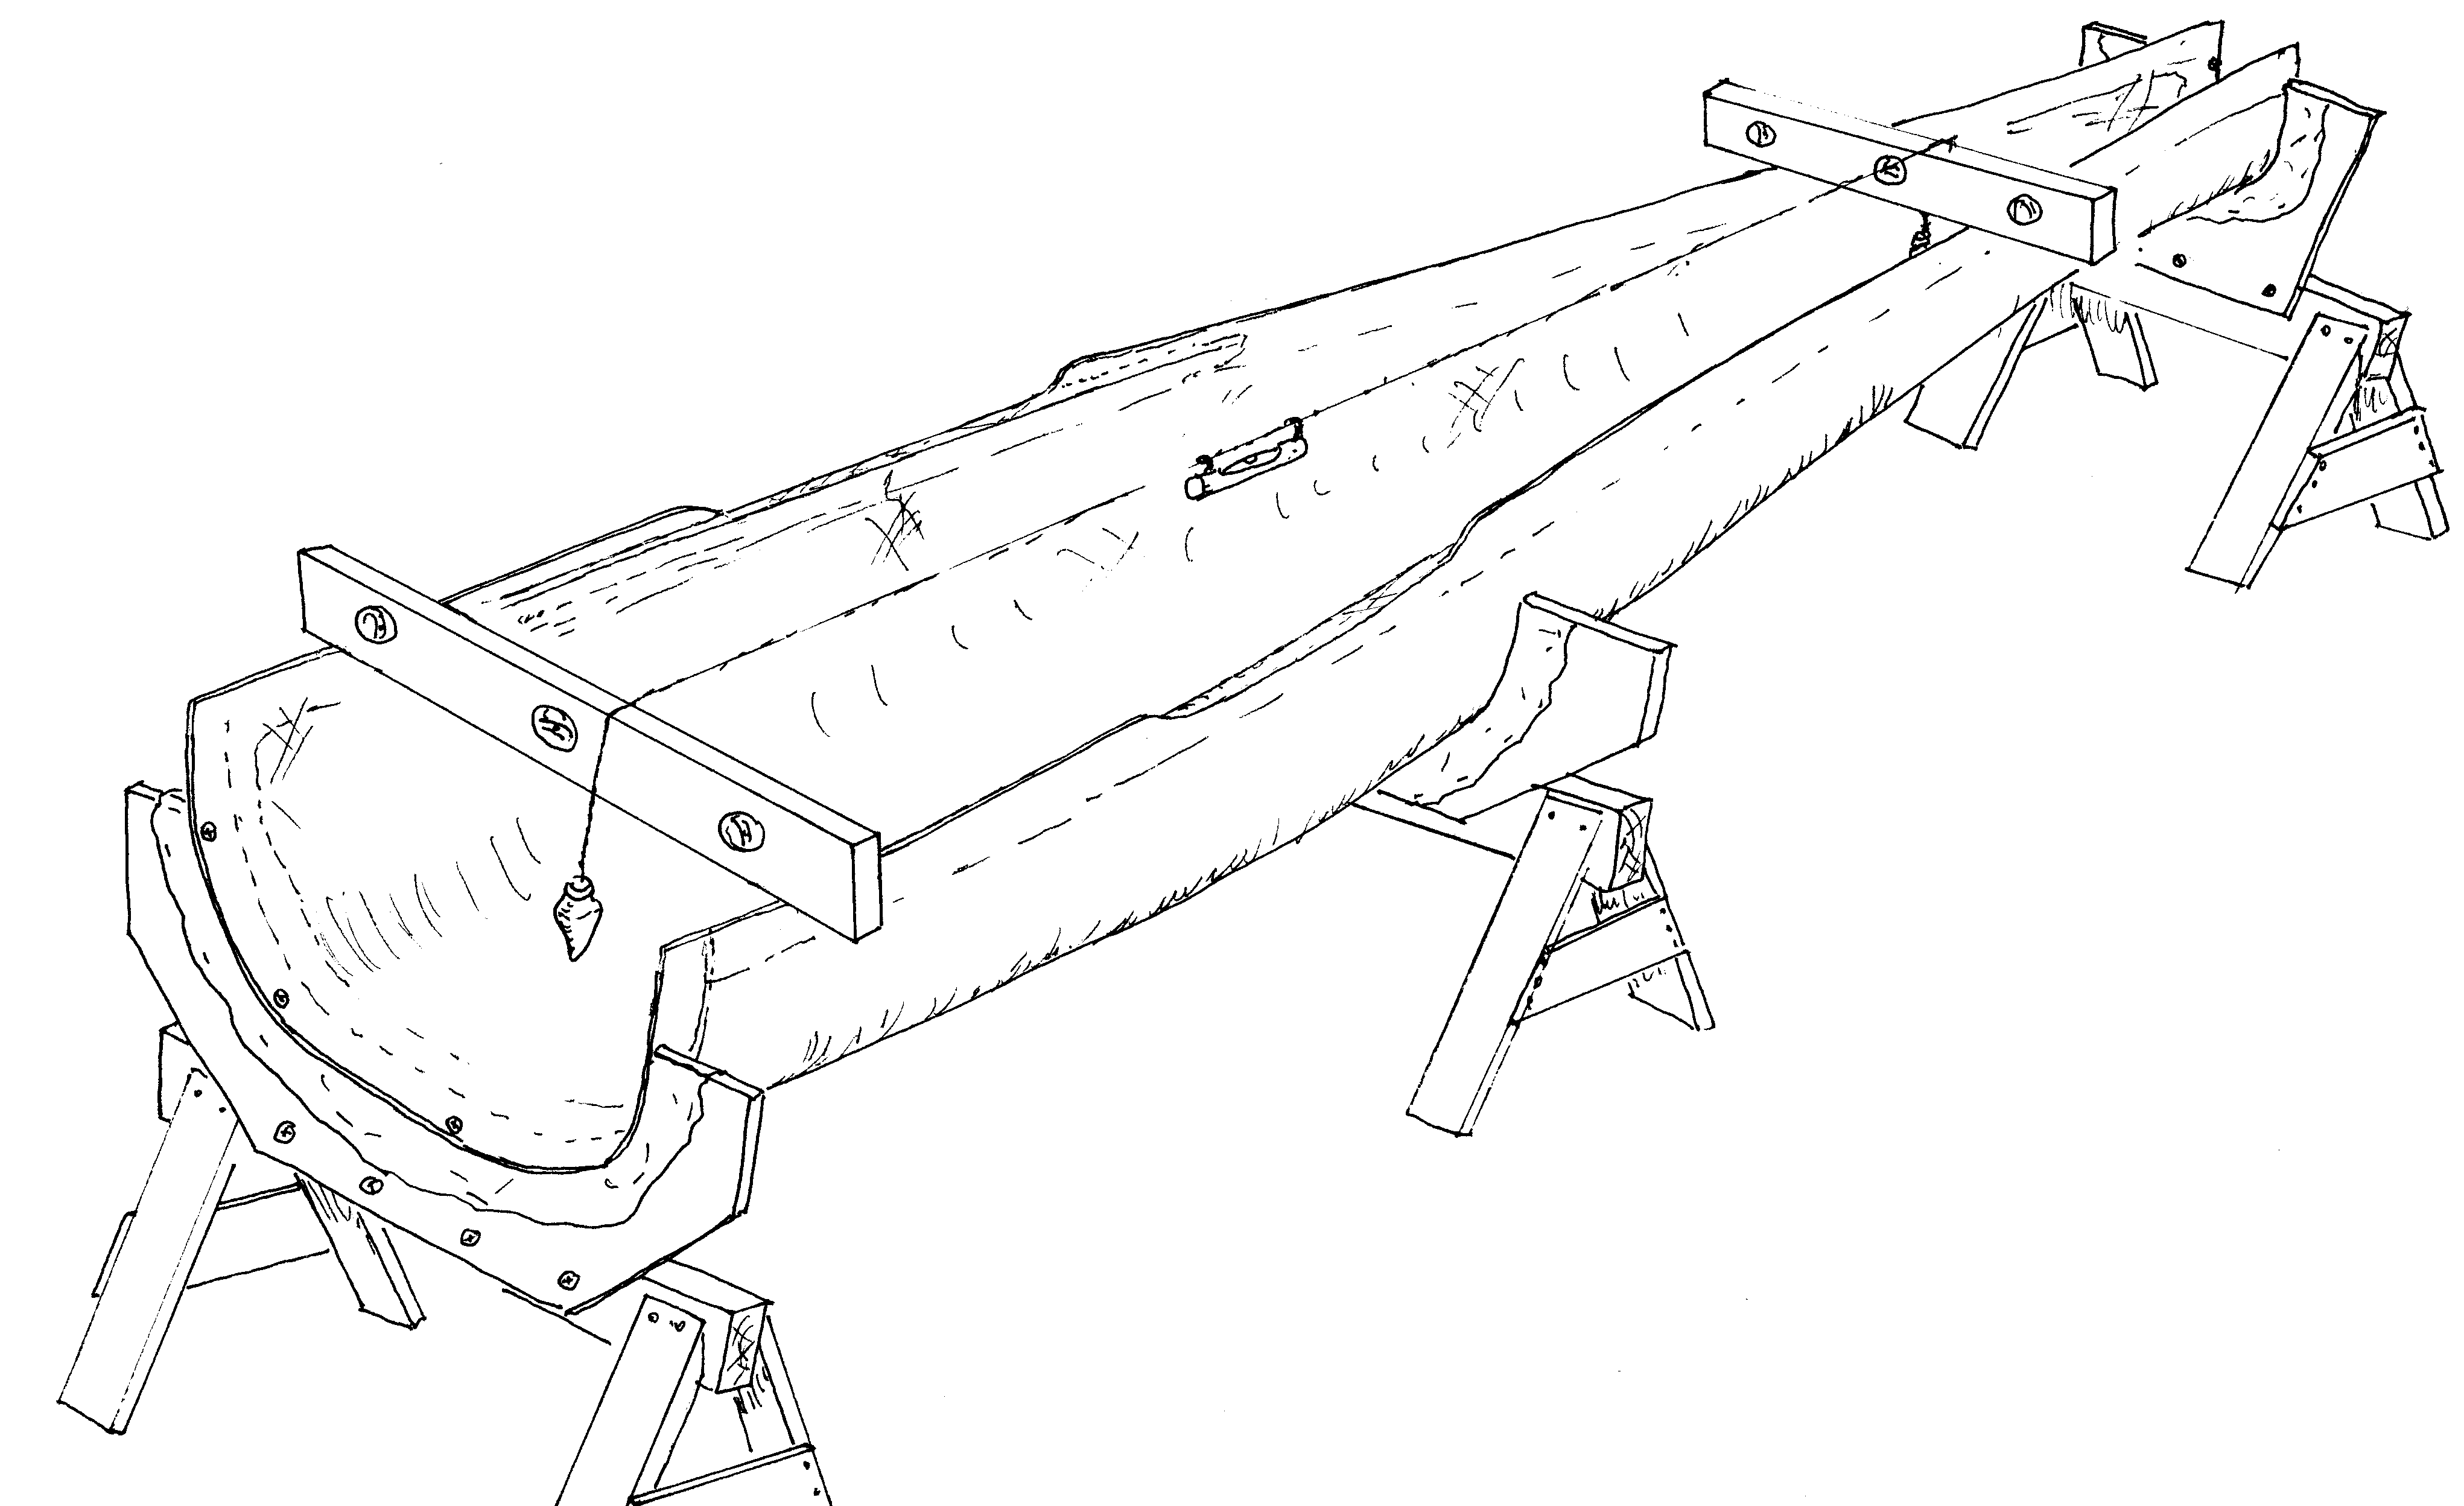
Figure -2, Leveling the fuselage bottom.
It is suggested that drywall screws or similar fasteners be used at each end to secure the lower molded fuselage section to the cradle in the proper position. Locate the cradles at the very ends of the flanges at each end, to permit access for installing the firewall, and other features into the fuselage. Put the screws through the solid fiberglass in the end "joggles", near the very end of the part. Temporarily remove the screws during bonding operations at these local areas to avoid trapping them in a laminations. Check the set up to make sure that the part will not shift out of position during subsequent operations. If it becomes necessary to move this assembly. repeat the leveling process before any additional work is accomplished on the assembly. Actually straightness and lack of twist is more important than leveling at this time, but the procedure shown is the most trouble free method of assuring a true fuselage
Spreader sticks should be used to provide the proper width at the appropriate stations, since the molded parts have a tendency to close together in handling and shipping. Fabricate these spreader sticks from nominal 1X2 lumber material which is reasonably free of knots and relatively straight. The list of suggested stations and outside fuselage width dimensions at those points are shown below. Station zero is referenced to the back surface of the fire wall and this is a convenient reference to measure axial locations. For convenience in set up, the axial dimensions given are belt line measurements around the edge of the fuse’ rather than true stations. You do not need to make up and install spacers at all these locations, but try to use a representative number to hold the shape. It is suggested that you mark the spacers and locations for reference. Remove any spacer which is in the way during any fabrication steps but try to keep enough installed to hold the shape. As bulk heads are installed you may discard the spacers.
BELTLINE MEASUREMENTS
STATION |
OUTSIDE FUSELAGE |
0.0 |
WIDTH in INCHES |
30 |
43 3/8 |
40 |
44 1/2 |
50 |
45 3/16 |
60 |
45 5/16 |
70 |
45 1/16 |
80 |
43 7/8 |
100 |
39 1/2 |
120 |
32 11/16 |
140 |
25 9/16 |
TEMPORARY FITTING OF THE FUSELAGE TOP
The fuselage upper section will be temporarily installed to assist in placing
some of the other components.
It may be useful to store the upper fuselage section in this temporarily installed position whenever there is no work going on in this assembly. This storage location will help these parts retain their shape until final bonding. (Reference figure 4-3 showing the temporary installation of the fuselage top)
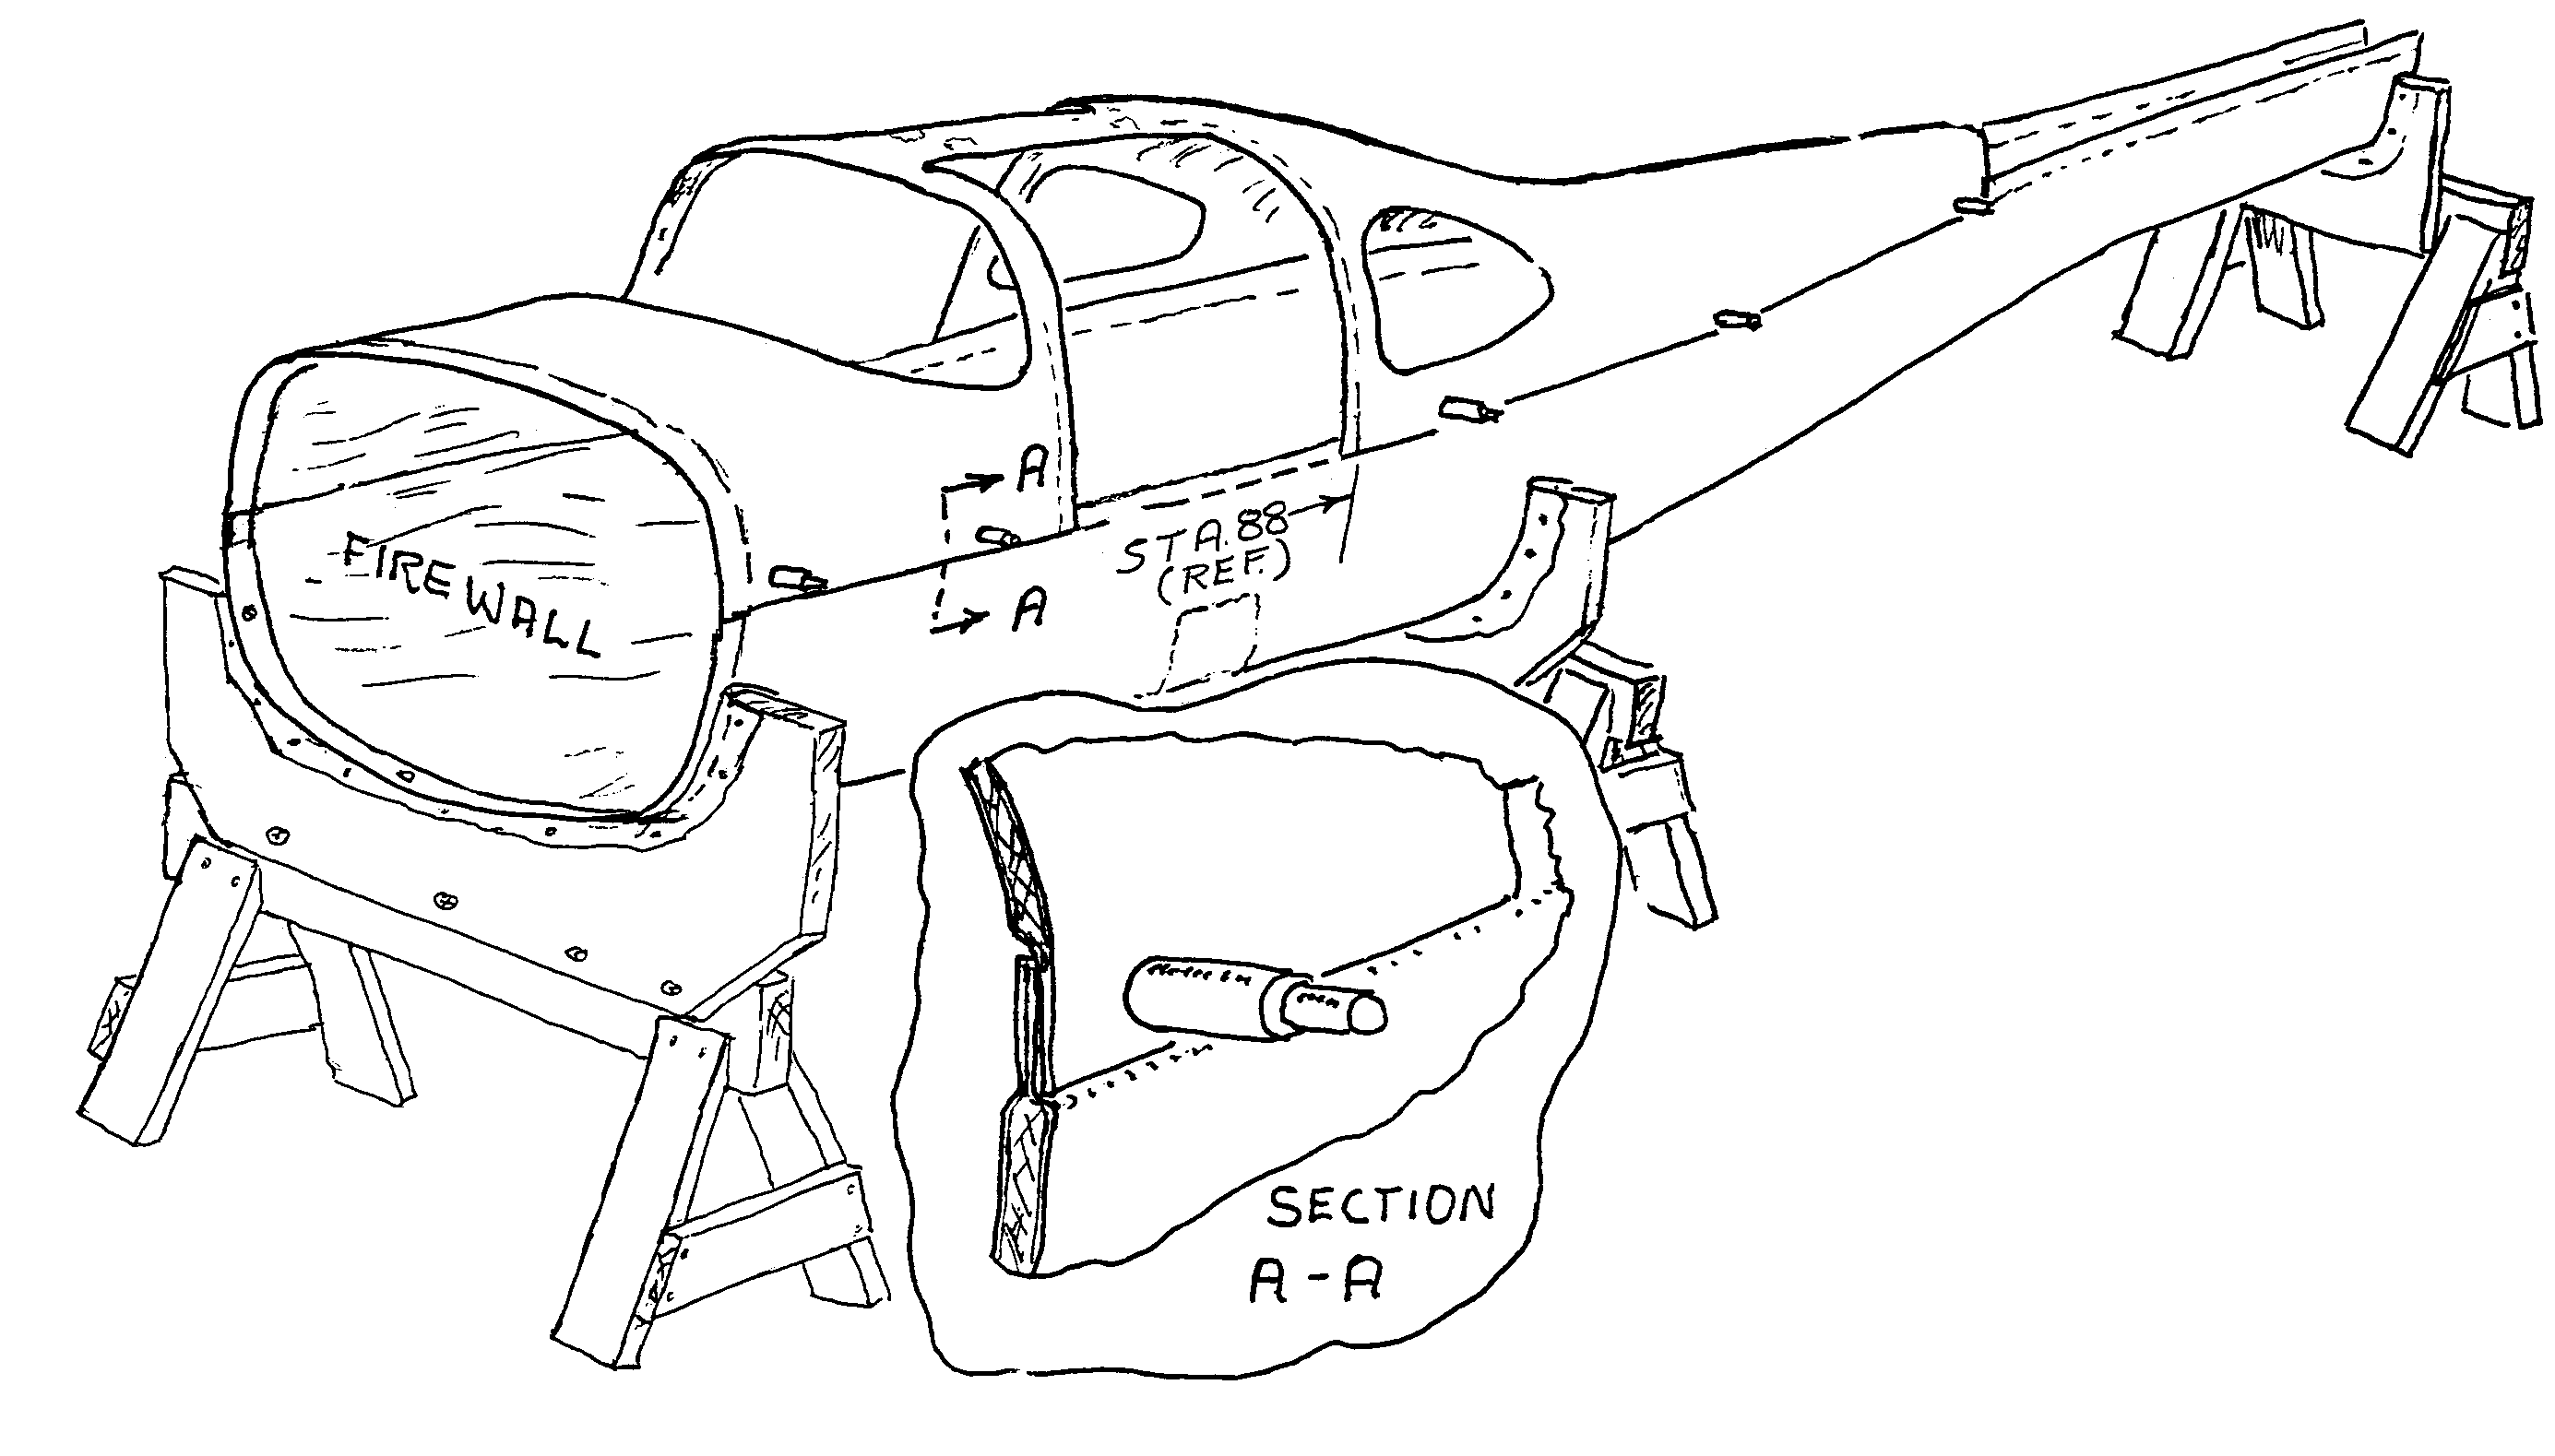
Figure -3, Temporary attachment of top skin.